How To Measure Blood Pressure With A Sphygmomanometer
When it comes to testing and monitoring patients’ health, ensuring that you have reliable, accurate readings is a critical aspect of providing health services.
When triaging a patient for treatment or monitoring, blood pressure is often a key indicator for a wide range of health conditions, including hypertension, dehydration, blood loss and kidney failure.
In this article, we will explain how to use a Sphygmomanometer, also known as a blood pressure monitor, to measure a patient’s blood pressure effectively, making it simple to identify and monitor blood pressure.
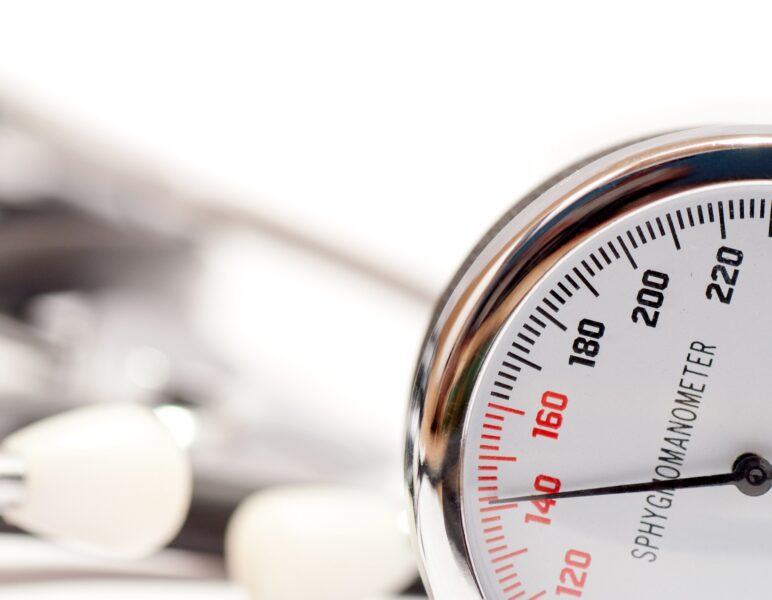
What Is A Sphygmomanometer?
A standard Sphygmomanometer has four primary components:
- Cuff: The cuff is the most recognisable piece of a Sphygmomanometer. This is the short sleeve that is wrapped around the patient’s arm.
- Bladder: The bladder is located inside the sleeve and fills with air, restricting blood flow to limbs and allowing blood pressure to be measured accurately.
- Pump: The pump, also known as the bulb, is the bell-shaped component that is used to pump air into the bladder to inflate the cuff.
- Gauge: The gauge is the piece of the Sphygmomanometer that displays a pressure reading. Although the most common types of gauges are manual, with a needle that moves, digital gauges are also common.
What Types Of Sphygmomanometers Are There?
There are three main types of sphygmomanometers:
- Mercury: Mercury sphygmomanometers are a precise and reliable tool for taking a patient’s blood pressure. Because pressure is indicated by a mercury column, mercury sphygmomanometers return consistent and reliable readings without the need for calibration. Because of the high level of accuracy offered by these sphygmomanometers, they are frequently used in situations where a high level of accuracy is required, like clinical trials and scientific studies.
- Aneroid: Aneroid sphygmomanometers might be the most recognisable style of Sphygmomanometer available. Because they are more affordable than mercury varieties, they are commonly used across a range of medical applications, from GP surgeries to emergency medicine. However, they are slightly less accurate than mercury varieties and require occasional calibration.
- Digital: Digital sphygmomanometers are becoming increasingly popular in clinical settings and help patients monitor their health at home. The digital display is simple for non-professionals to read, and the pumps are often automatic, making the entire process simple and straightforward. However, digital sphygmomanometers can sometimes be less accurate than manual versions, which means they may not be as appropriate for use with some conditions, such as arrhythmia or preeclampsia.
How Do I Take A Blood Pressure Reading With A Sphygmomanometer?
Taking a blood pressure reading with a digital sphygmomanometer is simple, as the digital display will provide the necessary reading. However, taking a reading with a manual sphygmomanometer is slightly more difficult and will require access to a stethoscope.
Below, we are providing a simple step-by-step guide on how to take a blood pressure reading using a manual sphygmomanometer.
Setting The Cuff
The first step to taking an accurate blood pressure reading using a manual sphygmomanometer is to place the cuff on the patient’s arm.
The cuff should be placed on a bare arm, without any sleeves or obstructions, about 2cm above the elbow.
Most manual sphygmomanometer cuffs will have an ‘artery mark’, or a line indicating how the cuff should line up with the brachial artery, which normally runs along the inside of the arm.
Taking An Approximate Reading
In order to receive the most accurate reading possible, we are going to be inflating the cuff twice, first to work out an approximate systolic blood pressure and then again to capture a more accurate reading.
Begin by locating the patient’s radial (wrist) pulse on the arm being used to take a reading. Once the pulse has been located, inflate the cuff using the pump until you can no longer feel the pulse. This will provide the approximate systolic blood pressure. Take a note of this reading, and then deflate the cuff.
Taking An Accurate Reading
Next, we will be using this information to take a more accurate reading.
We will start by closing the air valve on the cuff and placing our stethoscope diaphragm over the brachial artery.
When you can hear the pulse through the brachial artery, begin inflating the cuff to 20-30 mmHg above the approximate systolic blood pressure we noted earlier. This should stop the pulse as the blood can no longer flow freely.
Then, open the air valve slightly, allowing pressure to release at a rate of 2-3 mmHg per second while listening carefully to the stethoscope.
After a few seconds, you will start to hear the noise of blood passing through the artery. This is called the first Korotkoff sound. Take a note of the pressure when the first noise becomes apparent: this is the patient’s systolic blood pressure.
Allow the cuff to continue deflating, and continue to listen for sounds. The last sound that you hear is the final Korotkoff sound. Take a note of the pressure here, as this represents the patient’s diastolic blood pressure.
If the patient’s reading seems to be outside of the normal range, you should consider re-taking their blood pressure, either by waiting 5-10 minutes or switching to the other arm.
What Is A Normal Blood Pressure?
According to the British Heart Foundation, ‘normal’ blood pressure ranges from 90/60mmHg to 120/80mmHg, but can go as high as 150/90mmHg for older patients.
‘High Normal’ blood pressure, also known as pre-hypertension, ranges between 120/80 mmHg and 140/90 mmHg. Although blood pressure in this range may not indicate an acute issue, it might be taken as a sign that lifestyle changes may be necessary.
Discover Professional Solutions For Blood Pressure Measurements At HCE UK
At HCE UK, we provide a range of medical devices and equipment to ensure that our customers have access to the tools they need to provide world-class medical support to their patients.If you are looking for medical tools, medical furniture, or any other equipment for a medical practice or ward, consider browsing our range of tools and equipment today.